
I think it's important to know the terminology and techniques used when learning any new business including rehabbing residential property and dealing with mobile home investing. Today's article has two goals – to share with you the “tricks of the trade” when it comes to Debugging a Home and Cleaning Light Fixtures; both of which I've learned recently in the mobile home business and residential rehabbing field.
How To Debug/Fogg An Investment Property
One of the first things I do whenever acquiring a new home is to make sure it is rid of all insects (i.e. cockroaches, ants, etc). This is a precautionary measure as I do not want to encounter any surprises from the animal kingdom when getting a home ready on the market!
Note: Believe it or not, there are so many places insects can hide within a home. It's better to be safe by taking care of these pesky critters before doing any work to the home!
Since I had to fog a home I recently acquired I've decided to share this technique with you step by step. I actually learned this technique from one of the park managers (another reason to have a good team!).
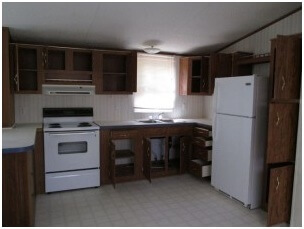
Before fogging a home, the first thing to do would be to open up all of the cabinets and drawers in each room. This way all hidden areas are now exposed. Here's a picture of what I had to do recently:
Once all the drawers and cabinets are opened, the next thing is to take some newspaper and spray and place them in each room. There are a lot of different sprays on the market to remove unwanted insects and animals.
I use one that is automatic meaning once the spray is enabled it will continue to spray the entire area. It shoots the spray up in the air filling the room. The spray that I use is called “Hot Shot Fogger” and can be found at your local supermarket or home improvement store.
After the newspaper and spray are placed in each area of the home, then enable the spray on each can first starting with the farthest area from the front entrance and working your way back to the front door.
Note: Before you start the spray, make sure the lights are off as well as well as the stove and air conditioning. Also, be sure to check all of the windows are closed.
Once the spray is enabled, leave the home and lock it up. Give it a day or two to come back. Usually, I wait a few days.
How To Clean A Light Fixture
Every time I get a home ready on the market, one of the things I make sure that gets done is cleaning and dusting the light fixtures. Though it seems like a tedious task, it is a detail that can be noticed. I've learned through experience that we tend to notice little details when going through other homes rather than our own. So, I've decided to share the process with you step by step.
Before I go into the details, here are a few supply items that I start with:
- Short Ladder
- Screwdriver
- Gloves
- Duster
- Soap/Cleaning Product
- Drop Cloth/Towel
- Sink/Bucket
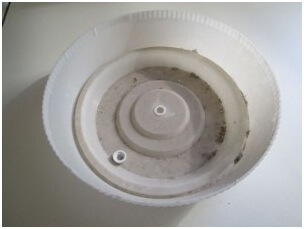
For each light fixture, I remove each one using a screwdriver (if I need to) placing it in a separate pile to be cleaned. Then, using the duster I dust around it making sure to remove all the debris and dirt. I remove the light fixture and place it in a pile to be cleaned. Here is what the light fixture looks like on the other side (yuck!):
Note: Most homeowners will never do this through the entire time they own the home. So yes, the light fixtures may be a bit dirty!
Next, dust around the area where the light fixture was once placed. Be prepared to see a lot of dust in this area. Once I have removed the light fixtures and have dusted around in the areas, then I clean each light fixture with soap and water. Afterwards, I place them to dry on towels. When they are all dry, then they are ready to be put back into place!
I hope this has been helpful and has given you some useful information – it definitely has for me. Happy Investing!


We love your feedback and welcome your comments.
Please post below: